 HVAC ResLoad-J Cloud Online Help
HVAC ResLoad-J Cloud is now built into the HVAC ResLoad-J app. It allows you to store all of your ResLoad-J projects in the "Cloud"
so you can backup and share your projects with other devices (iPads) and also
share specific projects with other technicians within your company.
This is all in the name of making you even more productive out in the field.
Sections
Overview
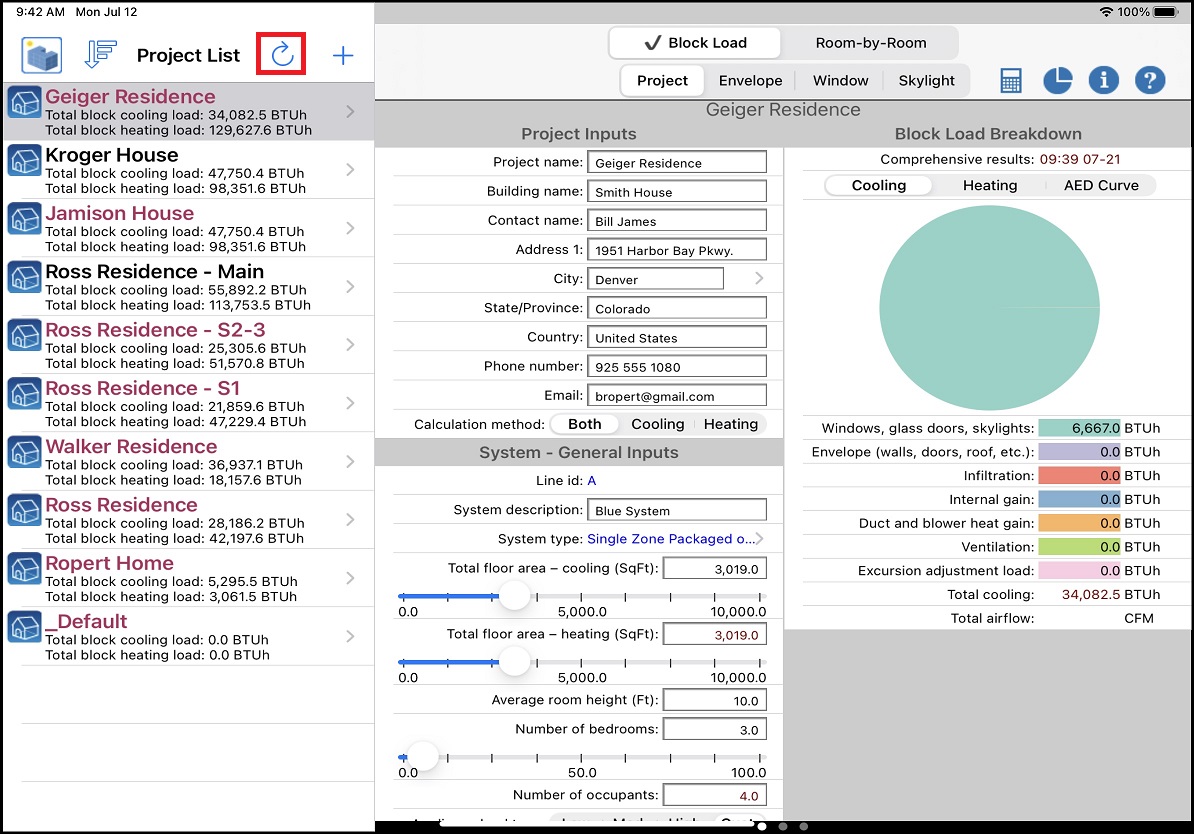
The following is the home view when you first open the ResLoad-J app on the iPad. It looks like the old home view, but now has a "sync" button that is highlighted
by the red box.
The HVAC ResLoad-J Cloud consists of two components:
- The HVAC ResLoad-J App allows you to perform HVAC load calcs and now you can sync those projects to the cloud. The syncing functionality is described in more detail below.
- The HVAC ResLoad-J Web: This is the website that allows you to display and share all of the HVAC ResLoad-J project information that is uploaded from the app and assign projects to other users within your company. It shares the same website as the HVAC Equipment Locator web which allows users to manage the Equipment Locator projects. Click here for help on using this functionality.
Here's the basic of how the HVAC ResLoad-J Cloud works:
- Create an account by pressing the
 button in the upper right-hand corner and clicking Login in the form that appears. (Please note, if you have already registered with the HVAC Equipment Locator app, you can use
the same credentials for HVAC ResLoad-J Cloud.)
- Either register or login in. If you are initially registering, you will receive a confirmation email. See the section below for more details about registering and logging in.
- After logging in, you will be able to sync up to 2 projects for free to be stored in the cloud. If you wish to store more projects, click here to access the Equipment Locator and ResLoad-J website,
login, then select the "Upgrade" option
to upgrade your account.

- To sync from your device (iPad), just click the
 button at the top of the project list or slide down the list similar to how you may sync emails on your mobile device.
This will send any projects you have created or updated to the cloud to be stored. It will also retrieve any projects that have been assigned to you.
- Go to https://www.carmelequiplocator.com (the HVAC Equipment Locator website), and log in. Once you are logged in, click the ResLoad-J Project List link in the upper right-hand corner to display the page that lists any projects that you created or were assigned to you.
- Click any project and assign it to another user in addition to yourself so you can share your projects. Once the other user synchronizes their device, they will see the project in their project list.
- Only one person can edit a shared project at a time so as to avoid over-writing each other's edits. Therefore, the "owner" of the project always has editing capabilities for the project. Once the owner makes updates and syncs, then when any other user syncs who has access to that shared project, they will receive those updates.
- Like you, we are in business to make money. Therefore, we charge for different tiers of project storage. If you want to sync and store more than 2 ResLoad-J projects, then you will need to pay a tiered monthly fee. Click here, login, then select the "Upgrade" option to upgrade your account.
- As mentioned above, project "ownership" means that a ResLoad-J project can only be edited by the user who created the project or "owns" the project. Any other authorized users who belong to the same company can only view it. "Ownership" of a project can be changed to another user within the same company using the ResLoad-J Cloud website.
- There are three categories of users defined by the ResLoad-J app: administrators, technicians, and clients.
- Administrators have full access to all projects for a company. In other words, admins can view and assign projects, even those that are "owned" by other technicians within the same company. Admins can also manage technicians from the same company so that they can view or "own" project information. An admin is always the first person to sign up for a company. In the app registration screen (described below), the admin can register by entering a registration email and password. Once the user is authenticated, the user is automatically assigned a new company id (viewed in the Manage Account portion of the ResLoad-J Cloud website). This company id is subsequently used by a technician, who belongs to the same company, to register (there is a company id input on the app registration screen).
- Technicians only have access to the projects that they have created or that have been assigned to them by the company administrator or other technicians in the same company. Technicians are able to log into the ResLoad-J Cloud website and share their projects with other technicians within the same company. After a technician has confirmed his or her registration, the technician still needs to be approved by the company administrator. This is done in the Manage Account form on the ResLoad-J Cloud website.
- Clients are able to only view the projets that are assigned to them by the company administrator. They never have any type of editing capabilities.
Registration and Login
If you wish to sync and backup your project data,
you need to register with the ResLoad-J Cloud using the ResLoad-J app.
The registration/login screen appears when you click the "i" button and click the "Login" option. Also, the Login form will appear if you click the "Sync" button and have
not yet registered or logged in.

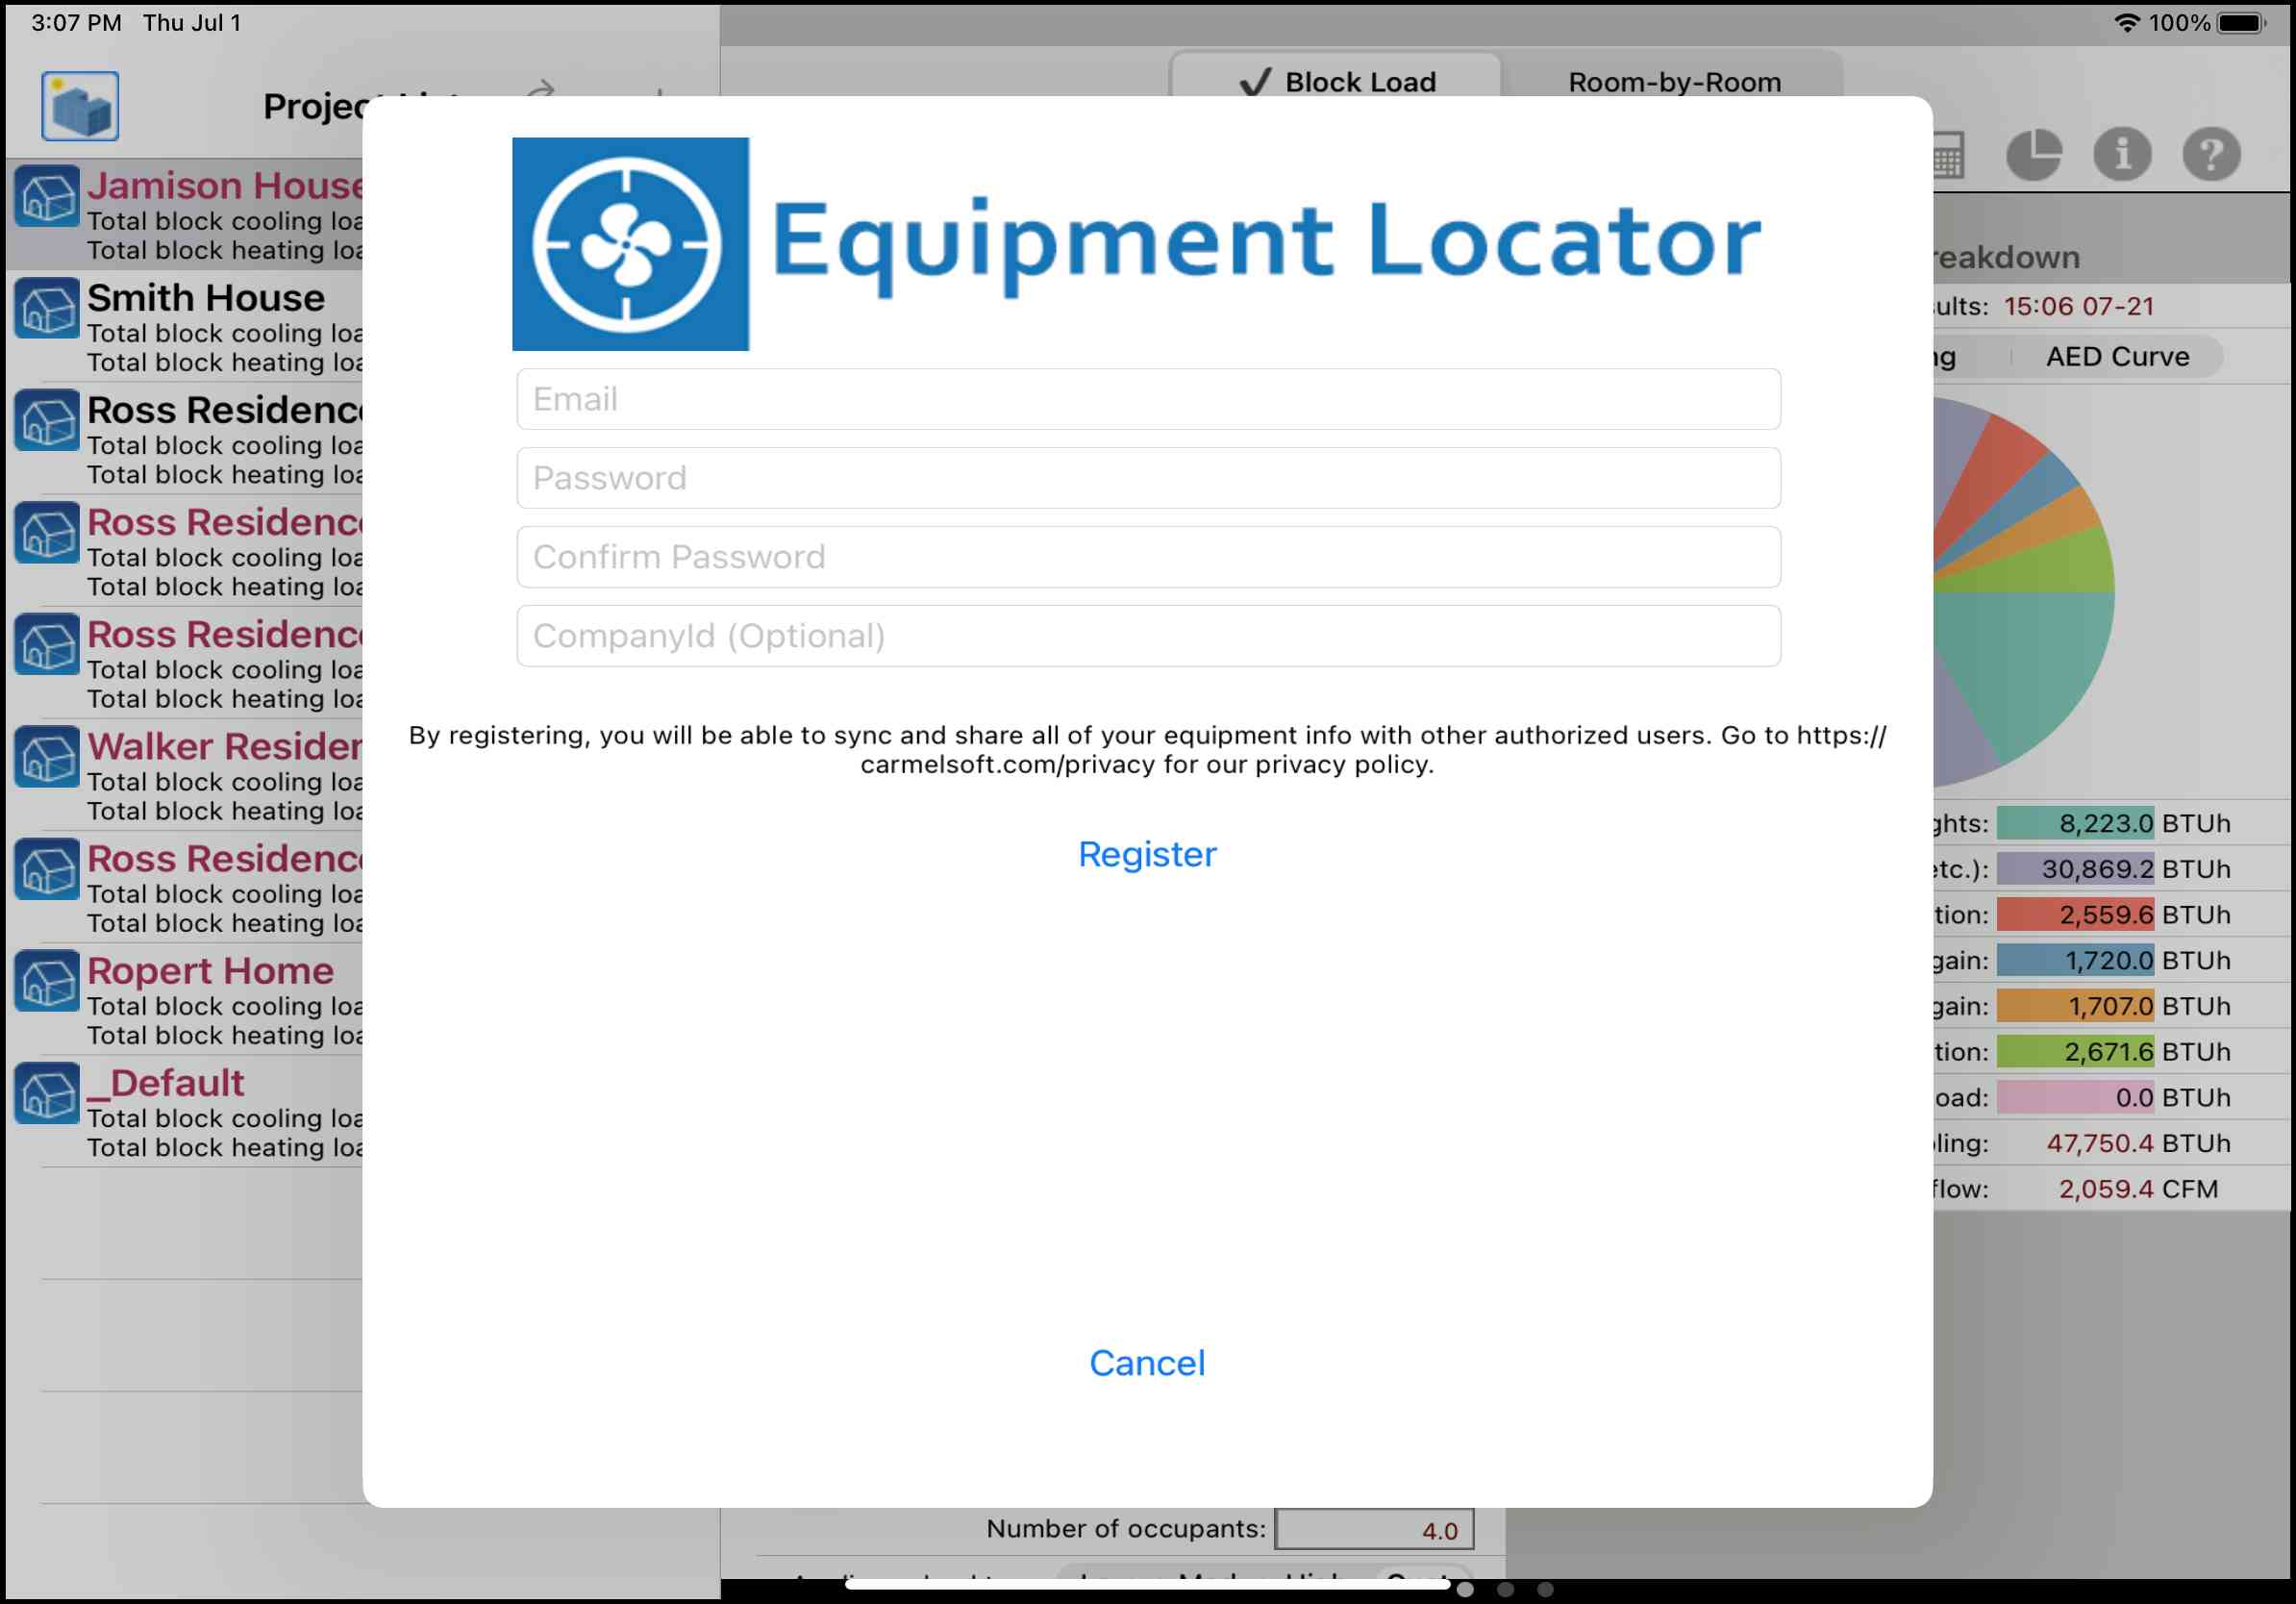
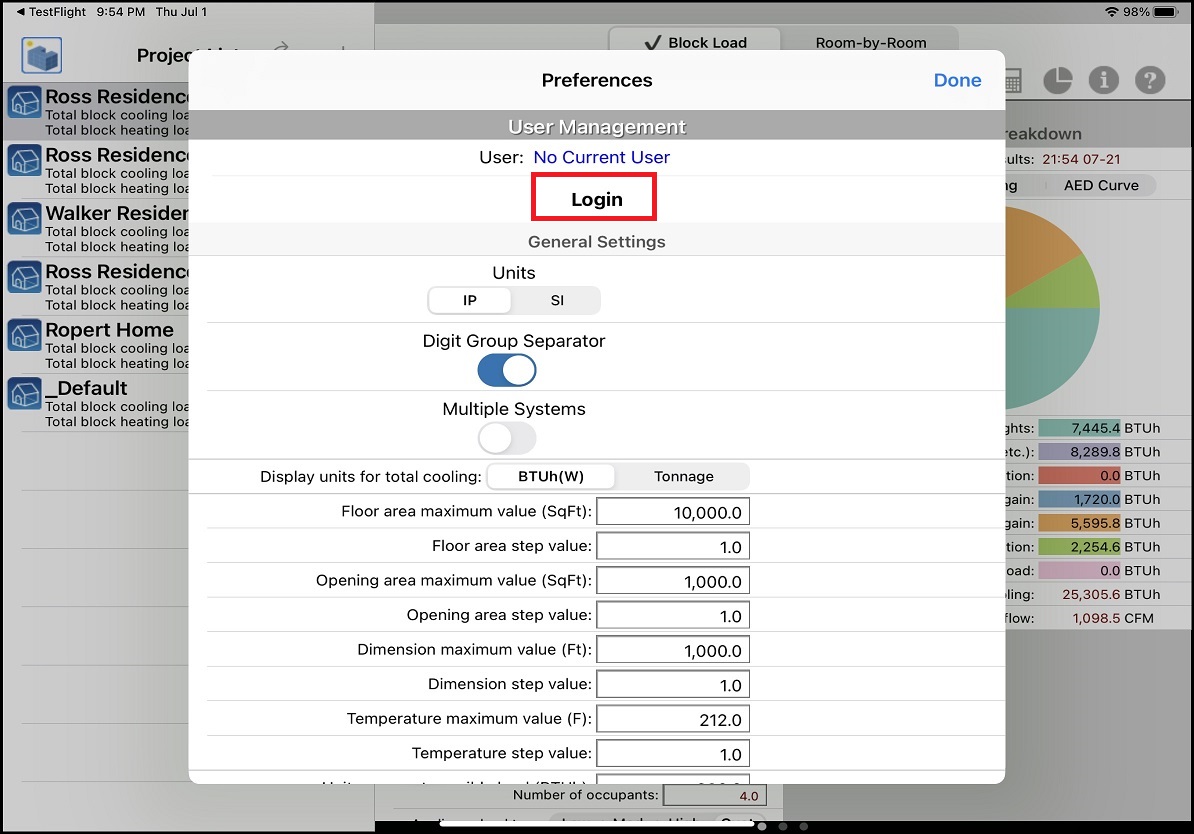 Click the Login option and the following form pops up:
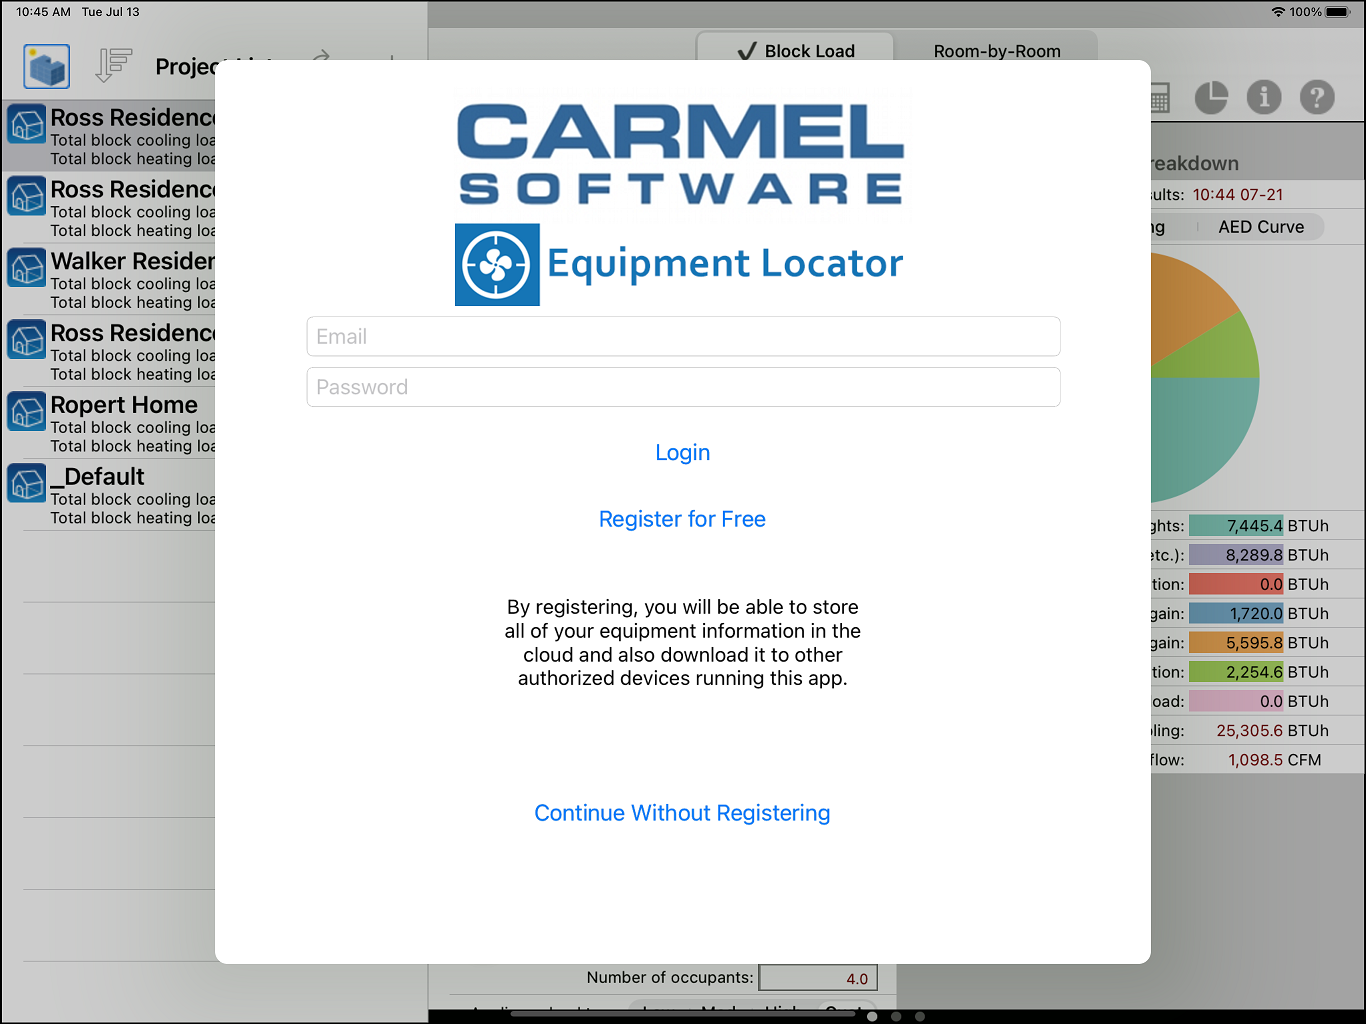
You can choose to login if you have previously registered (either on a previous version of the app or on another device),
or register if you are a new user. Below is an explanation of each of these options:
Register


Click the "Register for Free" link to display the registration screen. This screen allows you to create a new user registration. Enter a valid registration email, a password (twice to confirm), and if available, a company id that you were given by the administrator from your company. After you click the "Register" button, a confirmation email will be sent to you. Close the app and open your email client, then click the link within the email to confirm that you are a valid registrant. After clicking the email, return to the app, and login using the same credentials. You are now a registered user, and you will not have to login again on the app.
Login
If you have previously registered on another device or directly through the ResLoad-J Cloud, then re-enter the registration information (email login and password) and click the Login link to log in. If successful, a "Login Successful" message will appear.

Syncing
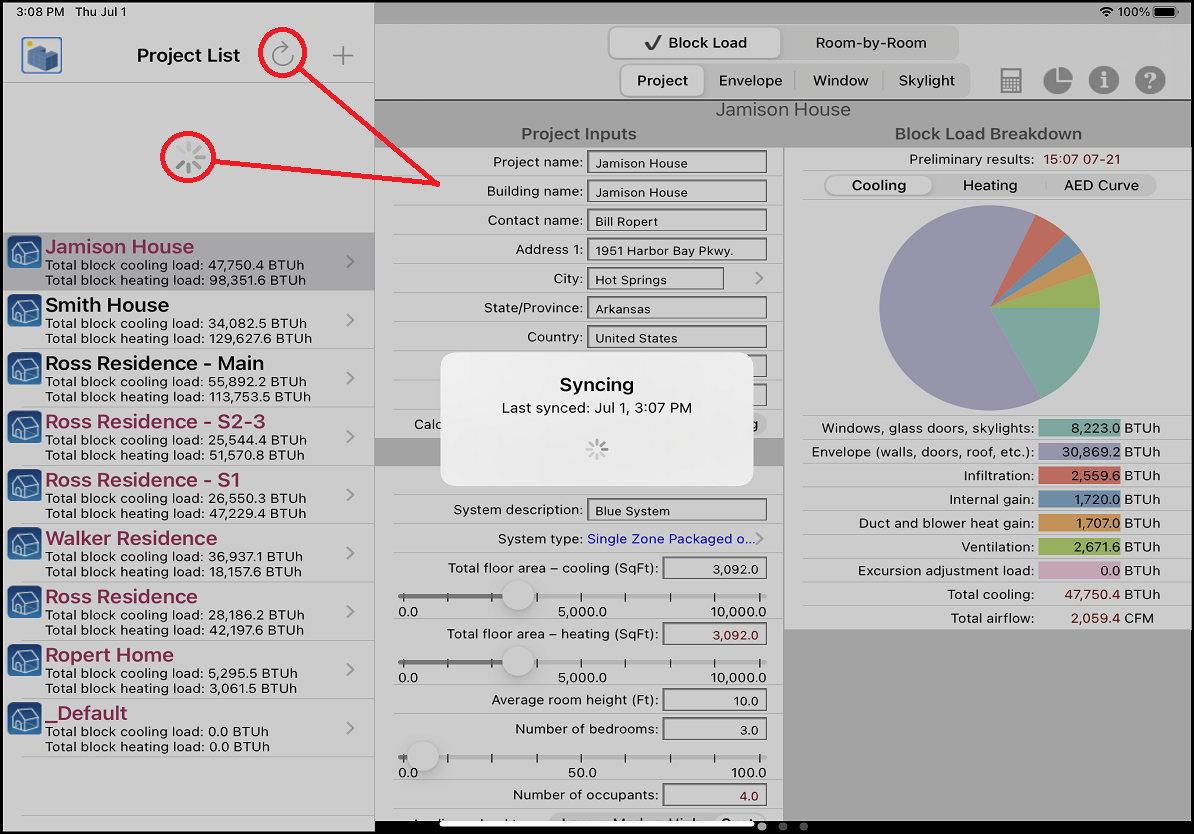
After you have successfully logged in, you can begin using the app to perform residential HVAC load calculations. Click here for full web-based documentation on using the HVAC ResLoad-J app to perform HVAC load calcs. The rest of the help on this page will focus solely on the syncing and cloud functionality.Assuming that you have already registered or logged in, you can go ahead and create and edit projects as you normally would do in the HVAC ResLoad-J app. Any time you want to "sync" or send these projects to the cloud, click the "Sync" button or drag the project list down as shown in the screenshot below. This will send all of the project data for any projects that you have editted or even just selected to the cloud so they can be stored. Depending upon how many projects have been editted will determine how long the synchronization takes. A small popup form will appear showing the status of the syncing and the last sync timestamp.
Please note: If you are using the free tier of the ResLoad-J Cloud service, then you can only sync 2 projects. You will receive a pop-up warning message if you try to sync more than 2 projects. If you wish to upgrade beyond the free tier, click here, login, then select the "Upgrade" option to upgrade your account.
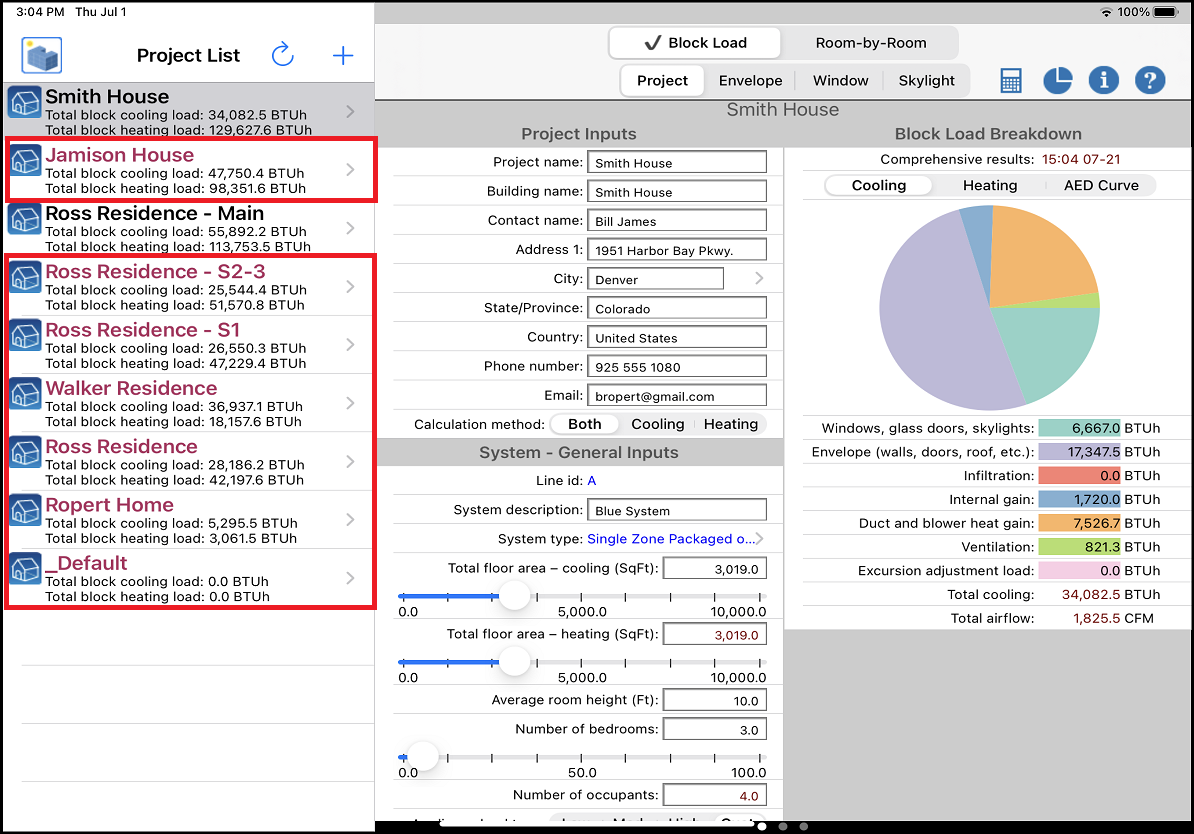
- After you originally log in, all of the default projects that came pre-installed with the app when you first downloaded it will appear maroon in color. The reason for this is, none of these default projects will synchronize to the cloud since they are local only to your device. If you wish to synchronize any one of these projects, just copy one of these default projects to a new project, and then the new one will sync.
- Any project that is shared between multiple users of the same company can only be editted by the "owner" of that project. In other words, only one user at a time can edit a shared project so as to prevent multiple users from over-writing shared project information. Therefore, if you have "read-only" rights to a project, the project name will appear in maroon. Any changes you make to a maroon-colored project will be over-written the next time you sync. If you want to make permanent changes to a project, either request that you "own" the project or copy the shared project to a new project (that you will now own) and make changes, then sync.
Deleting (or Unassigning) Projects
This section discusses how to delete projects and how it affects shared projects.To delete a project from the iPad app, just swipe across the project name with your finger from right to left and a red "Delete" button will appear. Click the "Delete" button to remove the project from your iPad.

The following list describes different types of deleting and unassigning scenarios:
- Deleting a project that you own and is shared with other users: By deleting a project from your device, it will obviously disappear from your device. Also, after any other users sync (who share this project), it will disappear from their devices, too.
- Deleting a project that is shared with you, but you do NOT own: By deleting a project that is shared with you but you do not own, this project will actually become "unassigned" from you. It will still exist on the owner's device and any other users' devices who had been assigned the project. In other words, you are not really deleting the project, just "unassigning" it from yourself.
- Deleting a project that you own and is not shared with anyone else: By deleting this project, it's as if it never existed and does not affect any other user.
Sorting Projects
You can sort the order of projects in the project list by clicking the button highlighted in the red square in the image below: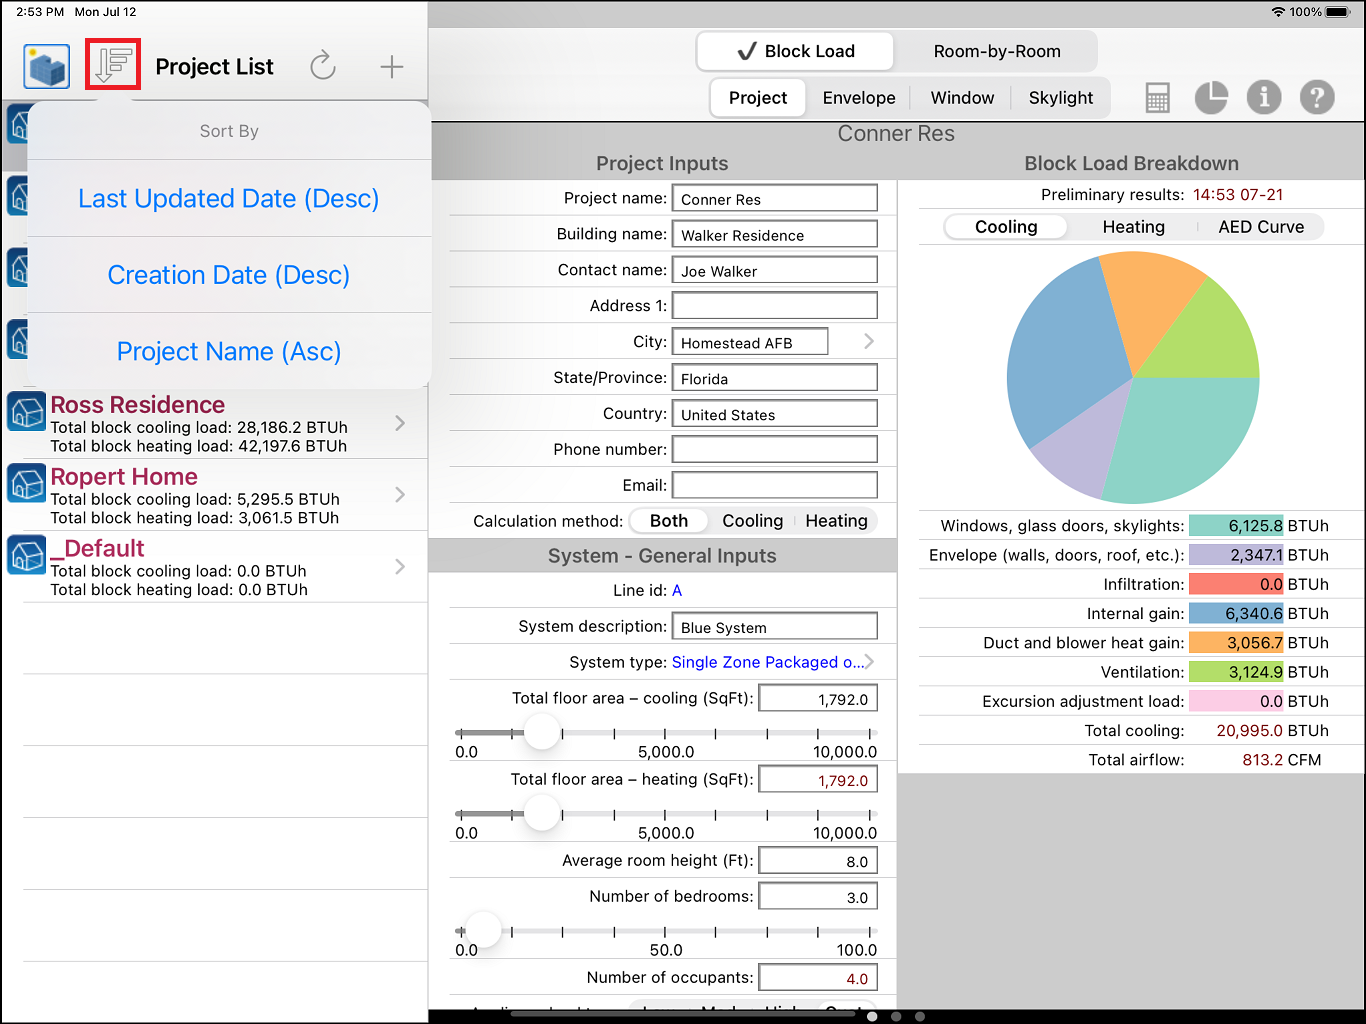
There are three sort options that appear when click the sort button:
- Last Updated Date (Desc): Sort by the date and time the project was last edited or viewed (in descending order).
- Creation Date (Desc): Sort by the date and time the project was first created (in descending order).
- Project Name (Asc): Sort by project name alphabetically from A to Z.
Security
The HVAC ResLoad-J and the accompanying HVAC ResLoad-J Cloud utilize the following security measures to ensure that your project information is safe and secure, including:- User Authentication: To synchronize information to and from the cloud and also to log into the web portal, you must input proper login and password information.
- Data Sharing: Any project information that is shared with other users can ONLY be shared with users within your company. Users can only belong to your company upon approval by the company administrator.
- Encryption: All information is transmitted from the mobile app to the cloud and vice versa using 1024-bit SSL encryption. This means that the information is transmitted without any risk of hackers intercepting and unencrypting the data.
- Secure server w/Backup: The server(s) that host the HVAC ResLoad-J Cloud are hosted on Microsoft Azure which is Microsoft's scalable and secure cloud infrastructure service that is continually updated. In addition, we route all traffic through Cloudflare that further secures the website by adding firewall functionality, secure DNS-routing, web-page caching, and denial-of-service (DOS) protection.